

Have you ever bought an outfit with the perfect jewelry in mind to accessorize it - only to get home and find you have no clue where said jewelry is?
I have.

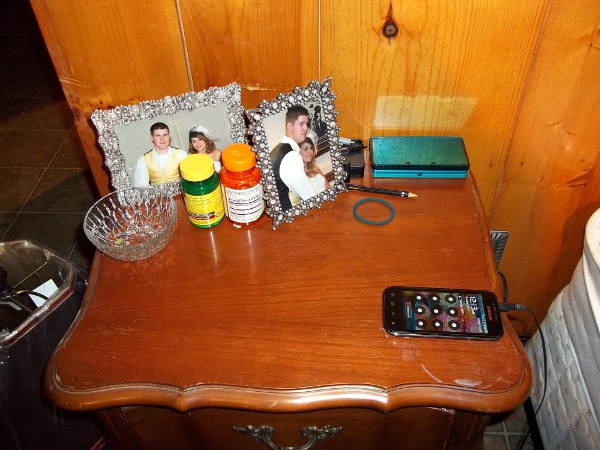
This is my nightstand; my dump station for everything from necklaces to bangles. It's so cluttered even my wedding photos are shoved off to the side. Nine times out of ten, in the middle of the night, I knock something over. After almost misplacing one of my late grandmothers necklaces, I decided it was high time I organized things.
I looked up some tutorials for a homemade organizer via Google, and headed to Michaels on Sunday to grab some supplies. Here's my process so you can make your own accessory organizer and reclaim your nightstands too!
A word of warning! My camera died on me halfway through the project (typical) so I had to finish the pictures with my phone. Please excuse the crappy quality.
Step 1: Supplies

1. Cork Board
2. Fabric
3. Ribbon
4.Screw Eyes
5. Mug Hooks
6. Glue Gun / Glue Sticks
7. Ruler (Optional)
I wanted to make two boards, a small one for earrings and headbands and a bigger one for everything else. I bought my cork boards, some fabric (Michaels had slim pickins, but I found some pretty red with a pattern), ribbon (I wanted something to contrast the red, so I got aqua), some screw eyes for the earrings (I got two packs of ten), some mug hooks (one pack of twenty), and my trusty glue gun and glue sticks. You can use staples too, but I didn't have a staple gun and I didn't see the point in buying another thing when I already had a glue gun. The ruler is optional.
Step 2: Cut and Glue

I'm seriously the most unorganized person, so I couldn't find my scissors. You know when you buy a manicure kit and it comes with those little, teeny-tiny scissors? Yeah, that's what I used to cut the fabric. Hopefully you've got scissors to cut your fabric with so it won't come out all wonky like mine. Just make sure you leave enough around the edges to fold over and glue.

Fold the fabric over and glue away! You aren't really worrying about making the back look good, since it'll be attached to the wall. Just make sure to pull the fabric tight so the front looks nice!

Taa-daa!!
Step 3: Ribbon

Now cut a piece of ribbon and glue only the ends down to the back. Leave the front slack so you can slide your headbands through it. I recommend gluing the ribbon along the bottom of your board. Optional, you can glue the ribbon along the front leaving little "slots" to hold your headbands.

Doesn't it look awesome so far?
Step 4: Screws

Get ready to screw (there's a joke in there, but now isn't the time). You can use a ruler on this part, if you opted for one, to make sure you're screwing in a straight line. If I were making this as a gift for someone, I probably would have. Personally, however, I don't care if my lines are a little crooked.

Use your earrings to help you space so you're not bunching everything up together. Remember the nightstand? Clutter is what we're trying to avoid.

I was going through my earrings and when I came across my studs I paused for a moment and tried to think of how I was going to get them on my board.
Then I remembered it was a cork board and felt so dumb. Just push them in, like pushpins, and keep the backs in a little bowl.

TAA-DAA!

There you have it! Easy-Peasy! I made my necklace board the same way:

Except I added the ribbon as a little border and used mug hooks instead of eye screws. Here's the finished product:

I may have to make a bangle board pretty soon, since I have so many of those.
Check out my CLEAN nightstand! It's so much better! Hopefully I can keep it this way for a little bit.
Anyway, I hope you could understand my tutorial and you find it helpful. If anyone makes a jewelry organizer using this, I'd love to see how it turns out! Good luck making and organizing your accessories, and as always, thanks for reading!
-Tasha
No comments:
Post a Comment